Add users with limited rights to a Kubernetes cluster #
To get started, make sure you have kubectl installed on your computer. If you haven’t installed it yet, refer to our article: Instal kubectl and connect to a Kubernetes cluster.
Basics you need to know #
What are service accounts? Service accounts are used to allow pods to read and use Kubernetes API objects as well as to create a kubeconfig file, which grants access to the Kubernetes objects limited to the namespace for any user or service. For more information,refer to the Kubernetes documentation: Managing Service Accounts.
What is a namespace? In Kubernetes, a namespace is a method of organizing and isolating groups of resources within a single cluster. This helps various teams, projects, or customers to share a Kubernetes cluster. For more information, refer to the Kubernetes documentation: Namespaces.
Add users with limited rights #
1. Create a namespace using kubectl. Enter the following command:
kubectl create ns test-namespace
2. Create a service account. You can use the code below:
cat <<EOF | kubectl apply -f -
**apiVersion:** v1
**kind:** ServiceAccount
**metadata:**
	**name:** test-serviceaccount
	**namespace:** test-namespace
–--
**apiVersion:** rbac.authorization.k8s.io/v1
**kind:** RoleBinding
**metadata:**
	**name:** test-serviceaccount-rolebinding
	**namespace:** test-namespace
**subjects:**
\-	Kind: ServiceAccount
	**name:** test-serviceaccount
	**roleRef:**
	**kind:** ClusterRole
	**name:** edit
	**apiGroup:** rbac.authorization.k8s.io
EOF
Replace “test-namespace” with your namespace name, “test-serviceaccount” with your service account name, “test-serviceaccount-rolebinding” with your role binding name.
3. Obtain a token from the account. Find the secret named test-serviceaccount-token-{% random characters here %} (of type kubernetes.io/service-account-token).
kubectl -n test-namespace get secret
Retrieve the token from the secret and encode it in this method.
kubectl -n test-namespace get secret test-serviceaccount-token-{% some random characters here%} -o jsonpath="{.data.token}" | base64 -d
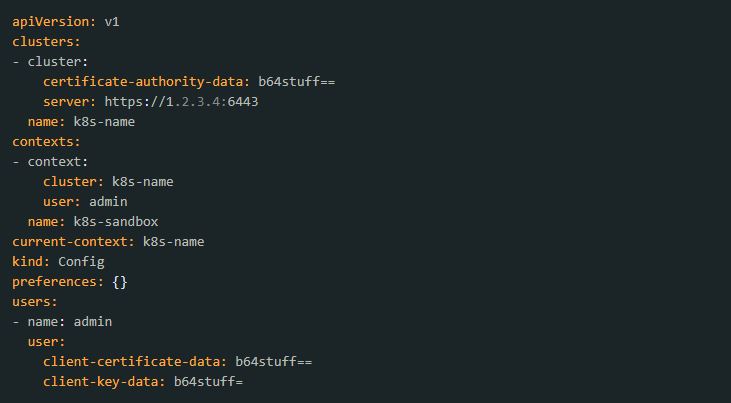
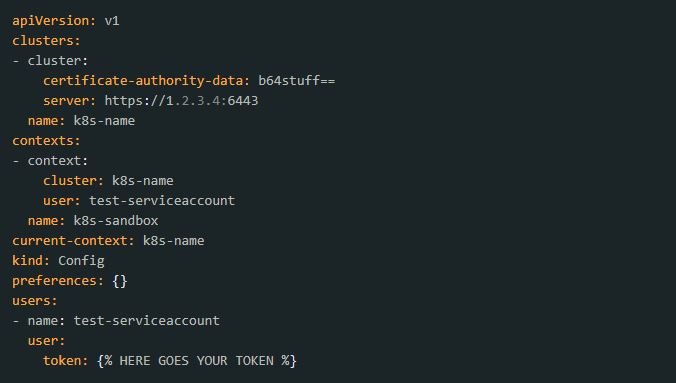
4. Prepare your Kubernetes config file for the service account. To do this, edit the file’s content according to the screenshots below.
Before:
After:
5. Check the created service account and Kubernetes configuration file.
Use your created kubeconfig file to connect to the Kubernetes cluster.

Repeat the procedure on namespaces assigned to the service account and others. The result should be fail (F) or success (S).
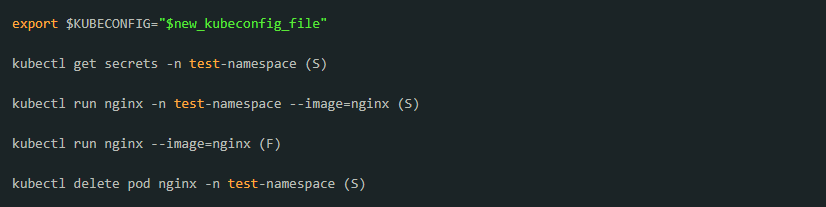
If successful, the service account and kubeconfig can now be considered as properly created.